
Introduction:
Are you looking to establish your own mail server for seamless communication? Look no further! In this step-by-step guide, we’ll walk you through the process of purchasing a server from Contabo and setting up a Postfix mail server. 🚀📬
Step 1: Acquiring Your Contabo Server 🛒

- Visit the Contabo website: 🌐 https://www.contabo.com/
- Navigate to the “VPS/Dedicated Server” section.
- Peruse the selection and choose a server with 25 open ports that suits your needs and budget.
- Add your chosen server to the cart and proceed to checkout.
- Fill in your payment and contact details to finalize the purchase. 🛍️💳
Step 2: Gaining Access to Your Server 🔑
- After the purchase, Contabo will provide you with login credentials and the server’s IP address via email.
- Open your terminal or command prompt on your local machine.
Step 3: Initial Server Setup ⚙️
- Establish an SSH connection to your server:
ssh your_username@your_server_ip- Update the system packages for optimal security and performance:
sudo apt update
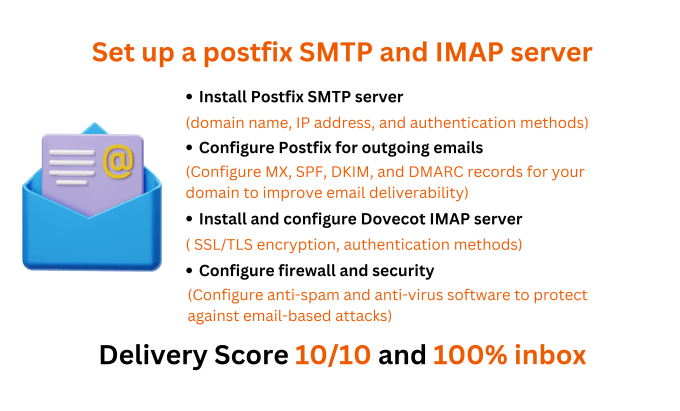
sudo apt upgradeStep 4: Installing Postfix 📮
- Install the Postfix mail server:
sudo apt install postfix- During the installation, select “Internet Site” and input your domain name.
Step 5: Configuring Postfix 🛠️
- Edit the Postfix main configuration file:
sudo nano /etc/postfix/main.cf- Configure these settings:
   myhostname = yourdomain.com
   mydestination = $myhostname, localhost.$mydomain, localhost
relayhost =- Save and close the file.
Step 6: Testing Postfix 📩
- Send a test email using the
mailcommand:
echo "This is a test email" | mail -s "Test" your_email@example.com- Verify the successful delivery of the test email.
Step 7: DNS Records Configuration 🌐
- Configure MX records in your DNS settings to point to your server’s IP address.
Step 8: Enhancing Security and Additional Configurations 🔒🛠️
- Implement security measures such as setting up a firewall (UFW) to allow necessary ports.
- Secure communication by incorporating SSL certificates.
Conclusion:
Congratulations! 🎉 With this comprehensive guide, you’ve not only acquired a Contabo server but also successfully set up your very own Postfix mail server. You’re now ready to enjoy efficient communication using your personalized domain. Remember that server setup can vary, so adapt these instructions to your specific needs. Good luck on your email journey! 💌👏
Nazmul47: I will set up a postfix SMTP and imap server on your vps for $90 on fiverr.com
For only $90, Nazmul47 will set up a postfix SMTP and imap server on your vps. | Are you looking for a reliable and secure email server for your business or personal use? Look no further! I can help you set up | Fiverr
www.fiverr.com